Friday, January 28, 2011

Make time to Brine: Brined pork chops are (more of) a sure thing.

The pork chop, well executed, is a great meal, especially with some roasted vegetables and a good starch. However, pulling off a great pork chop isn't the easiest thing if you just go in with a pork chop, seasoning and a pan. Without a well honed technique, without proper preparation such a pork chop may end up overcooked, dry and less palatable than you'd like. Thankfully, there's one simple technique that makes a pork chop (and several other meats) have a much lower margin of error: brining.

By submerging meat in a liquid of salt and sugar, a cook is able to lock in more of the juices. As explained in 
Charcuterie: The Craft of Salting, Smoking, and Curing "salt changes the shape of the protein in the meat or bird so that it can actually hold more juice than unbrined meat."

This same book provides the recipe I'm using for pork chops. This brine is for 4 thick pork chops.
We've got the mise en place:
pepper (1 tbsp)
 kosher salt (1/2 cup)
brown sugar (3/4 cup),
sage (4 tbps - it's supposed to be fresh..)
 and garlic, lightly smashed

NOTE: There's a good amount of sitting around and waiting time in this recipe, so this is definitely not an "I feel like this tonight, I'll start at 3pm" sort of thing. I'll admit it is a bit of a production.


All of the ingredients are combined into 2 quarts of water and brought to a simmer, stirring often.


Once the salt and sugar have been dissolved, let the solution cool, then put in the refrigerator to chill.

Once chilled, throw in your pork chops. Four thick chops go into the chilled liquid, then back into the refrigerator for 2 hours.
I put on some plastic wrap to prevent the chops from being exposed to air. After two hours, remove the chops, rinse them and put them in the refrigerator uncovered for at least an hour and up to a day.

I've decided to accompany the chops with mashed rutabaga and turnips.
Treat like mashed potatoes, bring to a boil in salted water, and check at 20 minutes and every ten or five minutes after with a fork. If a piece is pierced easily, then you're probably ready to mash it.

During the early part I added some powdered chicken buollion to give it that cooked in chicken broth feeling.
I put the nips into the vitamix. A masher will do as well.
The chops can be prepared either on a grill or by pan roasting. I opted for the latter.
I forgot to take the searing picture, but I seared the chops on each side, then slide them into a preheaded 350 degree oven.

New toy! Check it out! A probe thermometer let me pull them out at 140 degrees internal temperature. I may have let it get a bit over.

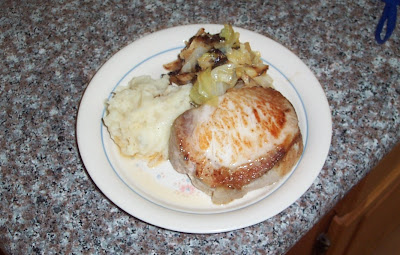
And there they are!


It may be hard to tell, but what I'm trying to show is how the chop is both perfectly cooked through and moist at the same time.

Happy cooking everyone!

Tuesday, January 25, 2011

Hellooooo Limoncello!

A few weeks back, I decided to make use of something in the old cabinet. Seeing as how a good friend of mine had given me some Everclear from Oregon, I decided it was high time to put it to good use. What better what to do that with than with some home made liqueur? I opted to go for Limoncello is a fine lemon infused drink indigenous to Southern Italy, and I have a very handy Meyer lemon tree in the yard.

Two good recipes for it are online, both by fine American newspapers, one from the New York Times, the Other from the Washington Post. The latter was the option I went with, seeing as how I had the aforementioned everclear. Turned out ok I must say.


The limoncello was sweet, strong and like candy. The character of the Meyer lemon zest really came through, adding to the sweetness of the sugar the infused alcohol was steeped in. See these glass below? Yeah that's way more than you need to drink. This stuff is thick, so if you do get a chance, try it out a smidgen at a time.

However, this blog isn't simply show and tell. If it was, that'd be too damn easy for me, for you, for everyone. And I like to do things the hard way, so bear along with me.

Seeing as how California doesn't have an appreciably liberal Everclear policy, for my second batch of limoncello follows the NY times version, using some good Kirkland Signature Vodka. If someone should tell me if I should say that sincerely or tongue in cheek, please let me know.

I reduced to use 250 ml of vodka instead of the huge measure. As I consider meyers a bit smaller than grocery store lemons, I upped the number. More lemon zest never hurt an alcohol recipe as far as I know.


Cut off the tips and ends of the lemons for easier handling.

Here's the liquor I used, as I threatened earlier.
I decided to use a Microplane Box Grater to really get the skin off into thin strips, for better flavor transfer, or that's the theory anyway.

A good shake into the large bowl. Handy hint, I used the vodka I was using to wash the bits off of the grate so as not to waste anything.
Pouring...
Done. Beautiful isn't it? Now cap it and let it sit for about two weeks.

Bam! Now to strain it.
And get every last bit out. 
I gave the mass of lemon zest a good squeeze with my hands, hoping to extract any last vestiges of goodness hiding, got a few drops out of it.
And now, we wait. For three more weeks. I'll report then!


Monday, January 24, 2011

Meatballs, the best way to celebrate the new year. Somewhere.

Welcome to the triumphant return of Cast Iron Therapy. It's a new year, a new life and a fresh slate. What says new better than turning several pounds of meat into delectable meatballs? I suppose cleaning out your files or going into a wilderness retreat might be for some people, but that's not my style. But lets get to the nitty gritty, or in this case, the meaty bally. 

The recipe I've chosen to follow today is adapted from Henry Hill's The Wise Guy Cookbook: My Favorite Recipes From My Life as a Goodfella to Cooking on the Run. Yes, that is a mouthful. Just like these meatballs! 

As for grinding technique, I've learned that from the fantastic fellows at The Paupered Chef.


Now let's get to it. First I've got the meat on hand. Notice the carefully measured bags that make things convenient after a recent Costco run.


Actually I didn't use that meat, I used this meat instead, which was still weighed, but no reason to waste extra bags since I'm using the meat promptly. 


The meat is then sliced up and mixed together in a bowl...


Which is then put into the freezer for thirty minutes before grinding. This is to prevent the fat from melting as you grind it.  


Oh Kitchen Aid Food Grinder, how I love thee. 


So yeah, I used the grinder.


 My arm isn't that pasty, really. It's the flash, I swear.


All in all, it's looking ok so far, so lets get onto the other ingredients.


Now to add the character to the meat. Salt, pepper, a couple of eggs for binding, garlic, onion, dried parsley and some home made bread crumbs. I find that the seasoned bread crumbs work fantastically as well. Not pictured is grated parmesan cheese, can't forget that. Even though I did. Stop judging me.


The requisite dicing an onion shot!


I'm refraining from an onion to anatomy joke. You're welcome.


Now add the eggs.


Give it a good mix with the hands. Yes, it will be cold. I have no help for you other than bearing with it, you strong rugged individual you.


The minced garlic...


Onion, cheese and bread crumbs....


And the salt, pepper and parsley all get thrown in for glory.


Mix it up, smile at your brother, ask him if he wants meatballs, then inform him too bad, that's what he's getting later. Form this into meatballs, any size you like, but adjusting cooking time as you need to depending on your needs. If you'll be cooking this in a sauce later, as I did, you don't need to be too careful, details shortly.


And voila done! I think I'm forgetting something. Oh right.


A good thick film of canola oil works well on cast iron pan, over a medium high heat. Cook each meatball to brown all over, a few minutes each turn, but don't worry if it's not fully cooked if you'll be putting it in a sauce later, as the sauce will help to cook it. I find tongs are a wonderful tool for this step.


And here they are, enjoy. May your new year be meaty and bally.