Sunday, February 27, 2011

Pretty Preview Pictures from a Party - Potato Pizza, Salsa, Carnitas and lard

As a staunch humanitarian, I like to give back to the community. And by staunch humanitarian I mean person who enjoys a good time. And by community I mean my friends. Anyway, after a day of picking up cups, reorganizing chairs and overall being rather lazy I've gathered the willpower to present to you, fine reader, a collection of photos to show you what I was up to the other day.

After a day of refusing to purchase cheese from a supermarket knowing I could get it cheaper from Costco later, my Costco card bearing friend was a bit late in coming, but I still wanted to give my brother and I something to munch on. With a large mound of pizza dough waiting to be used and some potatoes that were in need of using, I decided to make something I saw on Food Network's The Best Thing I Ever Ate, a potato pizza. A quick look on the internet showed me that it was simply a pizza dough with thinly sliced potatoes layered across a pizza dough, brushed with olive oil and seasoned with salt and fresh rosemary. Not having fresh rosemary I simply omitted it and went about making pizza as usual. 

Verdict? Pretty darn successful. While still looking quite white, the potatoes actually had a very soft texture to them, and absorbed the light sprinkling of salt well, giving a smooth bite before the thin crisp crust.

And what's a party without chips and salsa? I didn't make the chips myself, but I did make the salsa. As I often do, I emulated the fellows from The Paupered Chef and set about making a tomatillo (above) and guajillo (below) salsa. The tomatillo salsa had a nice acidic bite and a bit more of a kick to it with the serrano peppers in the recipe. I found that the guajillo salsa didn't have as much heat as I was expecting, but it was still very well received. Perhaps I soaked the dried chilies too long, or maybe I just didn't use enough? I'll use two full packages next time.


Chips weren't the only thing I made the salsa for however! They were a necessary part of my grand dish of the night, authentic carnitas fried in lard! I mean really what else is there to say? Stay tuned for more in depth postings on these dishes.


Friday, February 25, 2011

Turning Vietnamese Episode 3 - Pickled Mustard Greens or Dưa Cai Chua

A special thanks to mom for help on this one, again.

Dua Cai Chua, or pickled mustard greens is one of the very common accompaniments to a Vietnamese rice dinner, its clean crisp acidity matching well with any number of savory meat dishes common to the culture. There are many kinds of dua (pronounced like zu-ah), which basically means pickles, but of the varieties of Vietnamese pickles, this is my favorite. Aesthetically pleasing, crisp and in my opinion somewhat healthy, it is an ideal first pickle to introduce yourself (or friends) to.

This post is more on the "art" of the pickle, and this is a rough walkthrough of the steps. I'll revisit this later in an attempt to deconstruct my mother's recipe.

First a very large mixing bowl is filled with cleaned and cut mustard greens, you don't want to have it overflowing.

This is optional, but if you like them, add some thickly sliced onion (about a 1/4 inch, no need for exactness). These actually can be cut again in half after mom informed me later that these were a bit long.


A brine of water, salt and a little bit of sugar is mixed together, boiled and cooled. This is where the art comes in. You just want enough sugar to speed up the fermentation, but it doesn't need to be noticeable. The key is to get the salt to where you can taste it, a bit more than mildly salty and nowhere near very salty. This can be adjusted according to taste - according to mom.


Once cooled to to a comfortable warm temperature where you can hold your fingers in, pour the brine over the vegetable mix, pressing down every so often, perhaps every 30 minutes or so. The ideal is that you will submerge the  onions and greens in the liquid for a few hours, at least 3, before transferring.


The greens are then transferred into a sterile jar (with chopsticks for authenticity), pouring brine on top to completely cover. We had to use two jars since I may have went a bit overboard with onions. But that's ok because I like pickled onions.


Put in a warmish location, like the top of your refrigerator for a few days to speed up the fermentation process, testing a piece after a few days. Once it's reached your ideal taste, put in the refrigerator and continue to enjoy until you're done!


Thursday, February 24, 2011

Turning Vietnamese Episode 2 - Bún bò Huế

If you know anything about Vietnamese food, you probably have heard of Phở, but it may be slightly less likely that you have heard of bún bò Huế. If phở is that comfortable mother who keeps you warm on a gloomy day, then bún bò Huế is that awesome aunt who sits you in front of a roaring fireplace and maybe offers you some chili peppers. Chances are you’d want to introduce your friends to your mom before the aunt, because you kind of need to work up to that.

The reason I say this is because bún bò Huế requires a bit more of a tolerant palate than phở. Phở’s broth has most of its flavor come from a good stock of bones and several spices heated for a long period to draw out the flavor of the bones, really playing on the love of umami. Bún bò Huế is similar in its broth making with the difference in an added ingredient, shrimp paste, which while completely awesome, might intimidate some people with its strong flavor profile.

This is the assembling of a bowl so you have an idea of what you’re getting into. My dear mother had most of the ingredients ready for me so I can’t give you too much insight into the whole process this time. 

I wish this was a better picture, but here is the broth with some large pieces of pork in it to break down.


Rice noodles are then put into boiling water for about 8 minutes and set in a strainer to rest and finish softening up. Mom's tip, don't boil it to softness all the way in the water, as this will create a mushier end product, better to air dry it for a while.


The pork has softened a bit and is sliced up.


And placed in the on top of some of the noodles, a garnish of sliced onions and cilantro. Some stewed beef slices are also arranged on top.


Finally, top with broth and get ready to enjoy. I'm aware I went a bit overboard with the meat here, but I was trying to help clean out the fridge. That's the reason....yeah, that's it.


I wish this was one of the earlier bowls I had. You'd really see more of the shiny red from the soup base, which really helps to add a kick and a bit of nice color to the bowl.

Monday, February 21, 2011

I don't baseball, but I do Bundt.

First of all, please check out my earlier pitt bull public service announcement.

Sometimes things just fall into place. With the winter crop of oranges going into full swing in the front yard, it seemed serendipitous that I found this orange bundt cake recipe on Always Order Dessert, another cooking blog I've been following recently. With my relatively small dessert repertoire, an empty house and a special occasion coming up, it truly was the right time to dive into this fruity chocolatey project. Since the recipe is best read from the original website I'll simply point out various odds and ends.


Look, my very own digital kitchen scale! First thing I did was measure out the flour. According to this conversion website,  3 cups of all purpose flour is supposed to be 375 grams, but in this case I ended up with 438. In the name of science, I just went with it, and I think that perhaps due to the extra weight the cake was denser than the original recipe intended. Yes, I did sift the flour, but perhaps there was a bit of humidity in it or... something. At any rate, the next time I will cut it down to 375 grams to see what happens.


The mise en place: Two whole oranges, 3 sticks of butter, 2 cups of sugar, 3 cups of flour, kosher salt, baking powder, vanilla and three eggs.


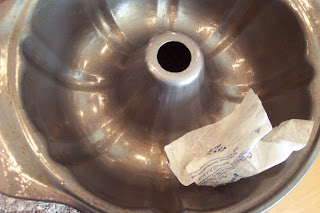
Once again, I think that the paper used to wrap butter sticks is a great way to grease things.


If you've got one of these bad boy Vitamix blenders you don't need a food processor to puree those oranges.


Btut you might need the pressing tool that comes with it.


Looking good there chief!


See this bowl? Way too small for mixing heated cream into chocolate chips. Completely inappropriate tool as well.


That's more like it!


And you end up with chocolate ganache.


Let the cake be completely cool. I'd say at least an hour after pulling it from the Bundt pan.


And your patience will be rewarded! Once again check out AlwaysOrderDessert!


Sunday, February 20, 2011

For the love of pitties - Public Service Announcement

Now for something completely different.  It's a great story on its own if you don't want to hear me ramble on it so you can skip my post and just go right there.

Look at this beautiful specimen of a goggie! Her name is Precious and she takes care of her owner Sande. Among other things, she is able to tell Sande, who is diabetic and legally blind, about the status of her blood sugar. Talk about a great kid! I could only imagine having children this useful and adorable.


Unfortunately, this friend of a friend is in a real bind due to harsh economic times. Precious needs some surgery which Sande can't afford due to being unemployed. Being legally blind that makes getting a job even harder, so it's truly heartbreaking that conditions have rendered her unable to take care of her baby the way Precious has taken care of her. So if you could lend a few bucks, or just spread the word a bit we could go a long way in helping a good cause that's close to home for so many of us. Here's the url once again in case you haven't clicked any of the links earlier http://preciousthepitbull.chipin.com/precious-the-pitbull-owned-by-sande

So please lend a paw! Please?

Turning Vietnamese Episode 1 - Fried rice


And now, we begin the first in a limited edition on and off run of a series of blog postings where I attempt to get closer to my Vietnamese roots. As I may have mentioned earlier, I'm not exactly a model student of Vietnamese cuisine. It's not that I don't like Vietnamese food, quite the opposite. I've just educated myself from readily available cookbooks, none of which have been Vietnamese, and when lessons were available from my mom, I just had a hard time remembering stuff, in general.

Ah, the high school brain.

Anyway, now that I've matured to some small degree and have some capacity to understand and remember verbal instructions I will now make a point of learning enough Vietnamese cuisine so that white folks no longer ask me, "Why not? Do you hate your culture?"

No, I do not. I was just, lazy thank you. And to show you how lazy I am, this post features something I already have learned how to make, but many are still interested in. Fried rice!

You will need:

Cooked leftover rice,
Eggs (usually one will suffice),
Chinese style sausage,
A seasoning liquid (to be authentic, go for fish sauce, but if you can't stand it then soy sauce will make a passable substitution. Still, I recommend fish sauce)
Optional but recommended: onion, garlic
Even more optional: carrots, peas. (I never use these)

Here's most of the ingredients, laid out and ready for destruction. I recommend the absolute largest pan you can find because you'll want the room to mix your fried rice into. By the way the little spouted pot thing is what we use to keep our fish sauce. Stylish no? Please note the odd looking red sausage. There are many recipes that make fried rice without it, but in my opinion it is this sausage which makes fried rice for me. Otherwise why bother? Grab life by the horns!

First I start with a hot pan with a splash of oil. This was a bit too much oil but it doesn't matter that much. In a  medium hot pan (or high heat if you like them to have a bit of cracklin) throw in some of the Chinese sausage links to heat them through and crisp the skin up.


While this is going I prep the egg(s), cracking them into a bowl, beating them and adding a tablespoon and a half of fish sauce, and the egg will indicate a nice darker tone to let you know it's good to go.


When your sausage is ready, slice to the size you want (don't forget to turn off the gas! but leave it on the burner to stay warm). My dad prefers huge hunks, mom slices it paper thin, I find both extremes leaving a bit to be desired, and cut them into what I'd imagine would be an overly thick nickel size. Small enough to have lots of pieces to mix around without being so ephemeral you can't enjoy the texture. Set aside.


Dice up your onion and garlic.


Turn on the gas again and add the onion and garlic to the pan, cooking just to softness, because they will still have plenty of time to cook. Now the moment you've been waiting for, actually frying some rice.


Add the rice about, two scoops at a time, mashing and pulling clumps apart with wooden implements.


Eventually the rice will  heat through and loosen up, allowing you to make the clumps fall apart quite nicely and you can continue the process of adding and pulling apart the rice.


Once you have lots of rice, having two implements and pushing them towards each other is a great method to prevent rice from piling over the edges of your pan.


Then add your egg-fish sauce mixture, and then start mixing it through the rice rapidly to cook it and season the rice simultaneously.


Once you've a lovely yellow shaded rice, add your other stuff! In my case, just sausage. The frowny face is a total accident by the by.


Taste the rice to make sure it is seasoned correctly. Sometimes when the egg hasn't been seasoned enough it may be blander than you like. This can be rectified by adding a spoon or two of more fish or soy sauce, and quickly working it through the rice so that you don't just have one spot of highly seasoned rice. 


And spoon out and enjoy! This goes great with some Vietnamese green pickled vegetables, which I think might be a great next installment to this post. Until then folks, enjoy!