Showing posts with label summer. Show all posts

Saturday, July 14, 2012

We’re Well into Summer, Time for Strawberry Ice Cream!

strawberryicecream001

Those are dried strawberries I’m garnishing it with by the way.

Another post, another absurdly late response to the 52 weeks of cooking challenge. I’ll be honest, it’s been pretty rough lately, I started an online course and I just started doing night classes to get my teaching credential. Not to mention all manner of freelance projects I can’t share at the moment!

I’m definitely keeping busy and I’m thankful for it, but it is definitely a drain on the ability to meet my ideal post quota.

Enough complaining though, I’ve got ice cream! Please note that I’m assuming you have an ice cream maker. There are other ways to handle it when you don’t have one, but really, if you like making ice cream, it is worth the investment. I’ve been using an older model of the Cuisinart Ice Cream Maker for a number of years now and I have no complaints.

Tuesday, July 5, 2011

Cream Cheese Stuffed, Bacon Wrapped Jalapeños

Also known as Atomic Buffalo Turds, Armadillo turds and all sorts of other animals that need to do various things. By the by, this is my first time trying to blog using the Windows Live Writer so hopefully this post won’t stand out terribly, but if so, you know why!

baconpoppers 009

The process for making these are probably just what you’d imagine it to be. But I need a reason to show off some pretty pictures right? I recommend wearing some food quality plastic gloves for this process by the way. Here are the ingredients I’ve used. Cream cheese, jalapeños, bacon. I think you can use whatever white cheese you’d like, but something milder would probably work better. Pepper jack might actually be interesting, but probably redundant.

baconpoppers 001

Slice the peppers in half.

baconpoppers 002

Remove the seeds.

baconpoppers 003

And stuff with cheese of your choice! Cream cheese is advantageous in terms of ease.

baconpoppers 004

Wrap each pepper half in half of a bacon slice. Or a whole slice if you’re feeling particularly sumptuous. Spear with a toothpick to secure the bacon. Do a better job of me with covering all of the cheese with bacon if you’re going to be grilling and need to turn it over due to overly hot temperatures in the case you don’t have full control over the charcoal.

baconpoppers 005

Grill or baking the stuffed peppers. If grilling, I’d recommend indirect heat if possible, covering and keeping an eye on it, checking it say, every 5 minutes until cooked. As I didn’t have that option I actually had to flip it onto both sides to cook the bacon. If baking, it is 10-15 minutes in a 450 degree oven.

baconpoppers 008

Once finished, have a cold beer or perhaps a glass of milk ready and enjoy!

baconpoppers 010

Monday, June 27, 2011

Hot Days of Summer Call for Hotter Food - Apache Fry Bread

While I was searching through the internet for various dishes good for parties, I saw a suggested link for Apache Fry Bread. Immediately intrigued, I eagerly leapt into the world of fried bread. I have no qualifications as to how authentic this recipe was, or how my rendition would match up, but anything involved dough and five pounds of lard struck me as a win win situation (except for my waistline).  A very simple recipe outline was also encouraging, as well as the rather low price for ingredients (everything was available at home).

First, flour is mixed with salt and baking powder. Next time I'll go slightly lighter on the salt, no need to go up to a level tablespoon. Or substitute with kosher salt. 


 Stirring with the fork, whirrrrr!

Slowly add water and mix it in with a fork. The recipe says to have three cups on hand. Both times I've made this, I've only needed two cups of water.


Most of the way through, keep mixing until...


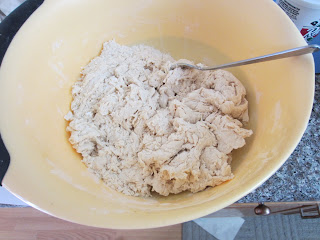
It pulls together into a mass that can be kneaded. Add flour if it's too sticky. I needed a few extra handfuls myself.


After the lumps are out cover it with plastic (this doesn't seem too authentic. But neither does a plastic bowl I guess.) This needs to rest for an hour. At maybe about 45 minutes through, it is time to start melting the lard in over high heat.


Here's the rested dough, which can be torn into golf ball sized chunks. With floured hands, shape them into little pancakes with your fingers.


And drop into the hot lard! Mmmm, victory is approaching.


The first three specimens of the batch.


The ones on the left I didn't shape quite as pancake-y as the latter half. But both are delicious.


The recipe suggested powdered sugar or honey. I preferred the fry bread with the honey myself.


In my research of this interesting dish, I learned that it's very versatile and could even be used as a tortilla substitute! I topped one of the more bowl shaped pieces with a slather of salsa, some seasoned ribeye and shredded lettuce. I gotta say it was freaking delicious. Kind of like a gourmet Taco Bell Chalupa.


Recipe adapted from Food Network:

4 cups all-purpose flour
  • 1/4 cup baking powder
  • 1 tablespoon salt
  • 2-3 cups water
  • 5 pounds lard (you can probably manage with less)

1. Mix flour, baking powder, and salt together in a large bowl. 
2. Add water gradually, mixing until it becomes a dough. Knead by hand until smooth.
3. Melt lard in a heavy pot, preferably a cast iron dutch oven! When hot it's time to cook!
4. Shape dough into small golf balls then stretch out into flat cakes, maybe the size of an average man's palm or bigger if you can manage it.
5. Let the dough brown for a minute and so, then flip over for another minute and so.
6. Remove from hot fat, drain on paper towels.
7. Serve with honey, powdered sugar, or as a sumptuous tortilla.

Wednesday, June 22, 2011

Summer is still going strong - Root Beer Barbecue Sauce

Nothing says that summer has truly arrived like the first barbecue of the season. Steaks, burgers, chicken, hot dogs, there are many ways to ring in the rapidly heating days of June. There would be some who say you can't have a barbecue without having a good barbecue sauce. I'd disagree, as I find that marinades, brining and simple good seasoning are all tried and true methods that can bring out the best in your many preparations of grilled meats. 

However, there is a lot to be said about a well executed sauce. With the right combination of sweetness, depth and tang, a sauce can really accentuate the taste of your grilled goods.

Root beer barbecue sauce isn't anything new, but it's novel enough to turn heads. 

Here's what you need. A saucepan, a good amount of rootbeer (there it is in that container. I needed the two liter for the previous post), ketchup, spices, citrus juice. For spices I'm using of of Penzey's chili mixes and I'm also experimenting by using up some apple butter, as I think it would be an interesting substitution for brown sugar. There's also a saucepan I thankfully decided would be far too small for my needs before getting started. The thing about reductions, which a root beer barbecue sauce essentially is, is that they bubble quite a bit, often rising as much as 5 times the height of the stuff was originally before actually reducing. So be on the generous side when selecting your pots people.


Here we've got the root beer bubbling with some of the ketchup. I went with at least 2.5 times the amount of root beer as I've got ketchup. Part of this was from rinsing the bowl of ketchup with more root beer to get everything cleaned off.


A nice healthy sprinkling of chili spices for the heat and flavor of the sauce. Note I'm not adding any salt because I intend to use this with a rack of ribs that I will be salting the night before. I think the sweetness and tanginess of the sauce will mix well with this long salting method.


Now for the X factor, the apple butter. I'll... let you know if things don't go as well as planned. But so far so good.


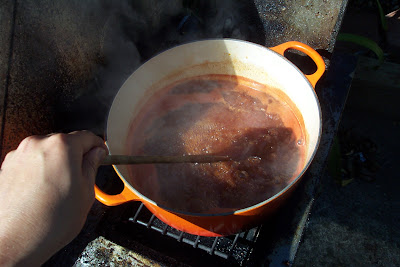
Have to stir the sauce up as we start to boil, just to keep it from scorching. It's going to be a while.


As things get active, you get a lot of steam, which you want to happen. More escaping water = A reducing sauce.


It's hard to tell, but here the bubbles start to become a bit more solid, rising in larger bubbles with walls supported by a thickened liquid. When the bubbles start to calm down a bit from this rush of bubbles test the sauce by lifting up a spoon of it. It's pretty obvious when it's not ready, as seen here.


This thickness is about ready. It probably could have reduced even more, but I was getting hungry for other things and wanted to move onto a late brunch. Sorry, just human folks. Anyway, take the saucepan off the heat and let it cool and set a bit.


Then when you're done "attempt" to pour it nicely into a clean container to use later. If you could be messier than this I'd appreciate it. And there you  have it. A root beer barbecue sauce. I'll be using this on some pork ribs later, stay posted!


Basic root beer barbecue sauce:

1 part ketchup
At least 1 part root beer, can go high as ten or more
Spices of your choosing (pepper, Italian seasoning, chili seasoning, cayenne, if it sounds good go for it)
.25 parts citrus juice (optional)
.5 parts sugar (optional)
Salt if you aren't going to salt your meat

1. Mix your ketchup, root beer and other wet ingredients into a saucepan large enough to deal with a bubbling sauce. Set heat to high.
2. Mix in any spices and other ingredients.
3. Stir the sauce as it heats.
4. Once it reduces down to either a sauce or a syrup, you're good to go. If you've hit a thick syrupy consistency, it's time to stop because it won't get much better than that.
5. Allow sauce to cool. Use right away or store for later.